L
Load drum loops (WAV format) and utilize the P2x style
Here's a step by Step for you....
1]Leave Style play mode and press the keyboard 'Sound' Button
2]Press 'Record'
3]Screen Menu and press 'Load Sample'
4]Navigate to you wav sample and 'Load'
5]Press
'Write' on the Screen Menu and keep same name or change at will to the
specific Drum family you want eg, Bass Drum, Snare Drum etc in the list
7]Press OK
8]Back to your Sound Screen + Press Menu Button on the keyboard
9]Press the 'Time Slice' Button -> Slice and 'Write to a location -> OK
10]Exit from 'Record' Screen via Screen Menu
11] Go back to style play mode and find your Loop in the slot you placed it in......
PRESS MEDIA
Go to utilities
FULL RESOURCE LOAD
EXECUTE
Ensure you load the Operating System first.
Inclination to delete all PCM multisamples and then load only the ones you want.
After doing a backup, go to ->Sound Mode, Record, use drop down menu, Delete, All multisamples, Yes, drop down menu, Exit from Record.
Now go back to Style Play Mode, select Disk, Load, find the set you want, Open it (not load), Open etc till you find the parts you want to load and where you want to load to.
Once happy with this, save it as a new set and from now on it will only load the ones you selected.
STYLE, SOUNDS, PERFORMANCES, PADS and VH PRESETS: Go to MEDIA MODE
Select the required DEVICE, locate the SET that you want to LOAD then click OPEN instead of LOAD.
Go to www.korgpa.com and download the new operating system and new musical resources.
It is important you have both. Once you have downloaded these 2 files unzip them with winrar.
Once you unzip the folders, you should have 2 system files : .PKG and .BKP files, along with 3 PDF files.
The .PKG file contains the operating system and the .BKP contains the musical resources.
Copy the two files to a USB stick.
LOADING the .PKG
Turn the keyboard off and insert the USB stick into the front connector.
Turn the keyboard on and hold onto the INTRO 1 button, a file browser will appear.
Once this browser appears select where you copied the .PKG file, once you have found it touch it on the display and press select. Now the file will be copied and a progress bar will show up and tell you the progress.
Once it is completed press OK in the display to restart the keyboard.
LOADING the .BKP
Locate
the .BKP file from your USB. Then press the MEDIA button in the utility
page select full restore resources command, then press execute. Browse
through the files and find the .BKP file.
Once you have found it select it in the display screen and press the Restore command.
Turn off the keyboard when finished then turn it back on again.
If you have any data you want to backup, follow this link before you install the OS:
1] Select a Factory style with suitable general pads that you like
2] Select Screen 'Pads' Tab
3] Change any Pad if necessary
4] Select 'Global' Button on the keyboard -> General Controls -> Tab across to 'lock' page
5] Lock the 'pad' + Exit
Test the 'lock' ->Note the pads used in the selected style. Change the style
and see that the pads are exactly the same. OK
7] 'Load' the new styles into User. Select a new style and note the 'pads'.
They are the same- 'locked'
8] Enter Screen menu -> Write. The new style now has the locked pads saved
Continue for the rest of your chosen styles with the locked pads, changing any if you
wish and save as described above.
Finished?
9] Go back to the lock screen and unlock the 'pad'..Exit. This will ensure
that all your original Factory and loaded styles will have their own pads….
This works and is not really much hassle to do:
LOCK the pads so that don't always change.
Global>General Controls>Lock>Control>PAD
Loading .SET files from unknown sources and older keyboards is risky and can lead to data corruption and faults on your keyboard.
The only safe .SETs are those developed and saved from the same keyboard and OS version as you are using.
Important - Delete GLOBAL or SONGBOOK sub-folders or you will have problems with your own data being overwritten.
There is no automatic way to merge the contents of two or more .SET files, and loading .SET files developed by unknown people will usually overwrite your own data. See exceptions which follow below.
If User sounds are developed to use only factory samples, these can be saved in a .SET file and given subfolder to other people and they can merge them with their own Sound data by using the OPEN procedure to find and load the individual sounds within the PCG file in the SOUND
If user styles are developed to use only factory sounds, then these can be saved in a .SET file and given to other people and they can merge them with their own Style data by using the OPEN procedure to find and load the individual styles within the STY file in the STYLE
Merging of .SET files containing User Sounds or User Styles which make use of User Samples is almost impossible for most users to do. It can be done if you have a lot of patience and experience with the Pa keyboard and if you are very technically minded.
Replacing factory Sounds or Styles with user Sounds or Styles is not recommended.
You will lose all your work when the next OS upgrade is installed.
There is no way to save and restore any of the work you have done.
M
1. Merging two SongBook files
You can merge entries from different SongBook files. Run the SongBook Editor, and open the first SongBook file.
Run a second session of the SongBook Editor, and open the second SongBook file. With the windows of both sessions on-screen,
drag
& drop entries from one window to the other one. You can
drag&drop Songs between the Book and Selected List panels. When
moving a Song
from a source Selected List to a target one, the
corresponding entry will be automatically created at the target Book
panel. Note: When copying a
Song to a different SongBook file, the Song's Song Selection Number is removed.
2. Changing a Style’s position Multiple entry editing allows for global replacement of resources. For example, say you moved a Style to a different location in your instrument; you can easily replace this Style in all entries making use of it. For example, if you moved the Style “Jazz Waltz” from location <1:6> to location <10:1>, here is how to edit your SongBook entries to reassign the Style: In the Book panel, click the Resource label to order all entries by Resource.
Locate and select all entries referenced to Style <1:6>, then double click one of them (or right-click and choose the Edit command) to open the Song dialog box for multiple entry editing. In the Song dialog box, check the “Style” checkbox, choose bank 10 and location 1, then click OK to close the dialog box. Notice how all selected entries are now referenced to Style <10:1>.
3. Changing the device and path to your midifiles and MP3 files. In case you move your midifiles or MP3 files to a different device or folder, for example from your PC’s hard disk to an USB memory stick, or from the root to the “Midifile” folder, it is easy to reassign them to the new device or folder. When editing a single entry, you can edit both the file path and the file name. When editing multiple entries, you can only edit the file path. Select the entry(es) to be edited, right-click it (them) and choose the Edit command. When the (Multiple) MIDI Song [all pa] or MP3 Song [pa2x/3x/800 only] opens, locate the “Resource file” line (or check the “Resource path” checkbox, in case of multiple entries). Enter the new device or path. You can also click on the yellow folder icon to browse the new file in the connected devices. Storage devices, like hard disks and USB memory sticks, are represented by IDs, as in the following table:
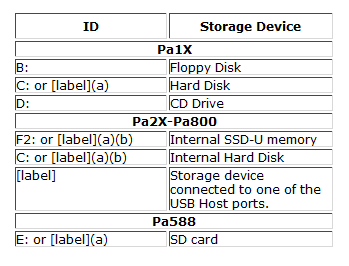
(a). The label is the name you assigned to the storage
device in the Disk/Media > Format page, prior to
formatting it.
(b). Note: The [label] can be applied only starting from Pa800 OS 1.02.
Hint: If you keep most of your files in an USB memory stick, you can easily move the stick from your PC and your Pa2X-Pa800. In this case it may be a good idea to choose the USB stick as the device.
4. Changing the associated text file
In case you move your lyrics text files to a different device or folder, for example from your PC’s hard disk to an USB memory stick, or from the root to the “Lyrics” folder, it is easy to reassign them to the new device or folder.
- Select the entry(es) to be edited, right-click it (them) and choose the Edit command.
- When the (Multiple) MIDI Song or MP3 Song opens, locate the “Text file” line (or check the “Text file path” checkbox, in case of multiple entries).
- Enter the new device or path. You can also click on the yellow folder icon to browse the new file in the connected devices. A list of devices is shown in the table above.
Activate The Mike manually in Global -> Audio Setup -> Audio In tab.
Hint: If you keep most of your files in an USB memory stick, you can easily move the stick from your PC and your Pa2X-Pa800. In this case it may be a good idea to choose the USB stick as the device.
1. The Mic-Volume can be stored in the Voice-Processor Presets.
2. There are a lot of free slots.
3. Each STS and Performance is linked automatically to VHP No.1
4. The Start-Performance 1.1 loads automatically a linked Styles during startup. Even if the Style-Change LED is lit or not.
5. Edit the 1. STS of this linked style and link it with your self-made VHP-No and store it.
6. So the mic-Volume ist stored in the VHP and the VHP is linked with the first STS of the linked Style. This Style must be linked with Perf 1.1
You can store the ON/OFF Situation of effect, Mic-On/off and VH ON/OFF also in an own VH-Preset. Each VH-Prest-Number ca be linked with each STS and Performance. So you can switch on and off the mic by changing from sts1 to sts2. The mic-slider cannot be stored. On the Mic-Page is a separate parameter.
The Startup-Volumes from Drum/Perc, BASS and ACC(Global) can be stored under Global/Global-Setup.
[LiM]
MP3 Recording:
To Record to MP3, Press the 'Shift' Button at the same time as the Record Button.
If you wish to Record and play the MP3 on the keyboard it is best to to turn OFF the Master EQ...
Page 176 pa2x Manual
• Sound button
• Record button
• Menu Button
• Select Time Slice
• Open Screen Menu > Load sample, so load it
• Check the measures
• Hit slice
• Hit C2 on the keyboard and hear 8 sounds as sliced
• Write it from Screen menu
• Exit Sampling Mode
• Style Record Mode
• Choose sound you saved when sliced, where you choose drum kit
• Menu Button
• Touch Import
• Touch Execute
• That’s it !! the loops is in the Var 1 now, play and hear it!
• Write the style, exit style mode !!
This section is available for files and folders handling including load, save, delete, copy, rename, backup, restore, delete, etc. functions for internal and external USB connected drives. During your extensive editing sessions the internal clock will fix the correct date and time in your files.
This parameter sets the way the MEMORY button works.
Chord
When its LED is on, the MEMORY button keeps the recognized chord in memory. When its LED
is off, the chord is reset when raising the hand from the keyboard.
Chord + Lower
When its LED is on, the MEMORY button keeps the recognized chord in memory, and keeps the
Lower track held until the next note or chord is played. When its LED is off, the chord is reset
when raising the hand from the keyboard, and the Lower track is not sustained.
Fixed Arr. + Lower
When its LED is on, the MEMORY button keeps the Lower track held until the next note or chord
is played. When off, the Lower track is not sustained when raising the hand from the keyboard.
The chord is always kept in memory.
Here is how to do:
1. Uncheck the Disk > Preferences > Factory Style Protect parameter.2. Go to Disk > Save. Select the ALL folder and press Open. Select the STYLE folder and press Open. Select the bank containing the Style you are looking for and press Open. Select the Style you want to modify and press Save.
3. Save the Style in a new .SET folder.
4. Reload the Style in an empty User location in memory, or in a Factory location you want to overwrite.
5. Edit the Style patterns in Style Record mode, and the Style Performance in Style Play mode. Save the changes.
6. Check the Disk > Preferences > Factory Style Protect parameter again, to protect Factory Styles.
Move your new DrumKit to a different Pa2X:
2. Select the ALL folder, and press Save To.
3. Create a new ".SET" folder, by pressing the New ".SET" button.
4. When the Save dialog box appears, check the "User Sound & DK" and the "PCM" options, to save the DrumKit header and PCM samples into the new SET folder.
5. Press OK, and select a target location.
6. The new DrumKit will be saved, together with its samples, into the newly created SET folder.
Moving older SongBook files (and other data) to Pa3X [Paolo - Korg]
Introduction
WHEN USING SONGBOOK EDITOR 1.4, PLEASE ALSO UPDATE YOUR PA3X TO OS 1.11 (or higher).
AFTER CHOOSING THE PA3X AS THE TARGET, DO NOT CHANGE IT TO AVOID MIXING DATA FORMATS.
The SongBook file uses links to Style locations and disk paths to locate
files on a disk. Since the new Pa3X uses different Style mapping and
disk labels than the previous Pa-Series models, migrating data from an
older Pa-Series model to the new Pa3X requires a few easy conversion
operations, detailed in this document.
NOTE: We received reports from users trying to solve compatibility
issues by renaming the internal disk label – for example, by changing
the internal disk's name from “[KHD_USER]” to the same label of Pa2X,
i.e., “[KORG HD]”.
RENAMING THE INTERNAL DISK IS TO BE AVOIDED. With the current operating
system (starting from release 1.10) renaming the internal disk is not
allowed at all.
To relink SongBook entries to Styles, SMF, MP3 and TXT files, please use
the SongBook Editor (freely available from our web site, www.korgpa.com; instructions are included with the installation file).
Working with Styles
Preparing data
To avoid having to relink each single Style, we suggest you load older
Favourite/User Styles into the same locations on Pa3X. For example, if
"MyStyle 3" was saved in the User 01-03 location on Pa2X, load it to the
same User 01-03 location on Pa3X.
Also, we suggest to transfer complete Style banks from the older
instrument to Pa3X. This way, each Style will remain in the same
location inside its bank.
Some users created custom Factory Style banks. We suggest to transform
them into Favourite/User Styles, to keep the original Pa3X Factory Style
untouched; this would also make them easier to transfer between
different Pa-Series instruments. However, you are free to create custom
Factory Styles on Pa3X as well.
1) If you have custom Factory Style banks, on the older Pa-Series model
go to the Media/Disk > Preferences page, and turn the Factory Style
and Pad Protect option off.
2) Go to the Media/Disk > Save page, and save each Style bank to be
transferred to a Favorite/User Style bank. (The procedure is detailed in
the User's Manual.)
3) On Pa3X, load the new Favorite/User Style banks (containing your
older Styles) to the Favorite/User Style banks. Be very careful not to
overwrite existing data of which you don't have a backup copy.
Use either an USB memory stick, or an USB connection with your PC, to
copy all your TXT files into the [KHD_USER] area of Pa3X. We suggest you
preserve the same folder structure as in the older instrument.
Relinking Styles
On Pa3X, Styles are organized in a different way than on the older
Pa-Series models. Therefore, SongBook entries will probably refer to a
different Style than on the older instruments.
By using SongBook Editor, you will be able to quickly remap the Styles
in the SongBook entries. The following table, for example, shows how
Style banks are mapped on Pa3X, compared to Pa2X/Pa800 (Style locations
in other Pa-Series models are detailed in the User Guide of SongBook
Editor):
While in SongBook Editor, click on the label on
top of the Resource column and see all the entries ordered by bank and
location number; you can then select all the entries that are based on a
particular Style bank, and choose the right button > Edit command to
access editing. While in the Edit window, check the checkbox next to
the bank number to link the selected entries to a different bank.
To relink single entries, select them and access the Edit window; then
edit the bank and location numbers to link the selected entry to a
different Style.
When relinking Styles, you will also want to relink any TXT file
associated to the SongBook entry. Please read below about how to relink
TXT files.
Working with SMF, MP3 and TXT files
Preparing Data
First of all, copy all sparse MID, MP3 and TXT files from the old
internal disk to the [KHD_USER] area of Pa3X. Use either an USB memory
stick, or an USB connection with your PC, to copy all your MID, MP3 and
TXT files into the [KHD_USER] area of Pa3X. We suggest you preserve the
same folder structure as in the older instrument.
Relinking SMF, MP3 and TXT files
Standard MIDI Files (SMF), MP3 and TXT files are linked to SongBook
entries through a standard disk path. For example, the link to a
"MySong.mp3" file on Pa3X will look similar to this one:
[KHD_USER]\foldername\mp3\MySong.mp3 *
*(Please note that the name of the label must include the square brackets: [KHD_USER])
On an older Pa-Series model, the disk label was different; for example,
on the Pa2X/Pa800 it was "[KORG HD]" instead of "[KHD_USER]".
While in SongBook Editor, you will be able to click on the label on top
of the Resource column and see all the entries ordered alphabetically;
you can then select multiple entries, choose the right button > Edit
command, check the checkbox next to the disk label, and then reassign
the linked files to the "[KHD_USER]" disk.
© 2011 KORG Italy SpA
N